I am working on a set of runners to go on the dressers in my bedroom. I have started and restarted this project several times and have not been happy with the designs and color combos I came up with. They all seemed too drab.
A friend of mine wanted to make a runner for her bedroom dresser and I searched online and found a few runners that I thought she might like - and of course went overboard and made a new topic for my tutorial links pages.. But anyhooo... I saw this one and I figured quilt as you go? Sure! I'll do it!
I had to do some math as the table runner would have been too small for the dressers - perfect in depth for the night stands although I'll probably have to adjust the length of the runner for them...
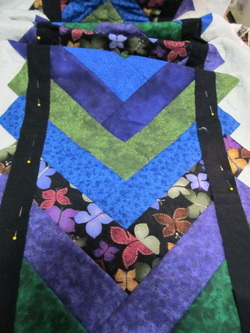
I picked out my colors. It called for 6 total and I decided to do the butterfly print + 2 blues, purples and greens. I hemmed and hawed about doing the blues as the butterfly print didn't have a true blue in it. It had purples, greens and browns plus a periwinkle color but adding the brown to the green and purple just looked like pucky so I opted to brighten it up a bit and do the blues. I'm glad I did. I personally think it looks stunning.
I started with a 8 1/2" square in the center which brought me to 20" finished at the end of the day. It is about 94" long which sounds ludicrous but I wanted the ends to fold over and hang off the edge. Id didn't want him to be able to put anything on the top of the dresser unless there was fabric under it :D Oh and the only time I pinned was when I sewed on that inner border. I'm glad I did. It was a life saver
The colors are REALLY off in the picture I'm embarrassed to say. I will get better pictures when I'm done with them all.
A friend of mine wanted to make a runner for her bedroom dresser and I searched online and found a few runners that I thought she might like - and of course went overboard and made a new topic for my tutorial links pages.. But anyhooo... I saw this one and I figured quilt as you go? Sure! I'll do it!
I had to do some math as the table runner would have been too small for the dressers - perfect in depth for the night stands although I'll probably have to adjust the length of the runner for them...
I picked out my colors. It called for 6 total and I decided to do the butterfly print + 2 blues, purples and greens. I hemmed and hawed about doing the blues as the butterfly print didn't have a true blue in it. It had purples, greens and browns plus a periwinkle color but adding the brown to the green and purple just looked like pucky so I opted to brighten it up a bit and do the blues. I'm glad I did. I personally think it looks stunning.
I started with a 8 1/2" square in the center which brought me to 20" finished at the end of the day. It is about 94" long which sounds ludicrous but I wanted the ends to fold over and hang off the edge. Id didn't want him to be able to put anything on the top of the dresser unless there was fabric under it :D Oh and the only time I pinned was when I sewed on that inner border. I'm glad I did. It was a life saver
The colors are REALLY off in the picture I'm embarrassed to say. I will get better pictures when I'm done with them all.
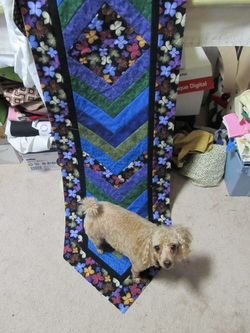
So David's runner would be the longest of the 4 I need to make.
My friend, Stacy, came over about 7am I sewed until 5pm - she had to leave for a baseball game about 1 but came back all bummed that they lost about 3ish.
I had to rip - A LOT. I don't know anyone who enjoys ripping. It just isn't fun. I sewed the wrong color orders, the wrong piece lengths then in the end I ripped out a butterfly piece in the very end of it all since it would have been ridiculously long on the dresser.
It just needs to be bound now which isn't that big of a deal. I do think I might wait and bind them all one right after the other. I'm excited to get the piecing done while David is home with the kids this weekend...
So yup. I'll be back in the craft room today.. and will hopefully have more of the set ready for binding.
Here is a link to the tutorial I used... It is relatively quick and easy. I do suggest laying out your colors in the order you need to sew them - and only doing one side at at time so you have less fiddling with it under the machine's throat. I was doing both sides at the same time for a bit and then opted to just work on it one side at time - wise move.
The tutorial is well written although I don't know why I printed out all the pictures especially since the colors that were used in the tutorial were gradient and didn't really show up in my cheap choice of printing in b&w... a bit of overkill for me but others might need the extra photos. It's all good though in the end.
Okay. I best get to quilting. Sun is up. The dog wants to be fed and the kids are itching to start playing video games...
 RSS Feed
