Yarn-or-Fabric
How to Make a Rolling Iron Station Tutorial
I found that I moved my big ironing board around a lot. When I went to move it, I almost always hit the release and then it would collapse on me. I decided to make a rolling ironing station to make my life easier.
After a lot of shopping, I finally found the perfect base at Walmart.com. It is the Seville 3 Tier Rolling Kitchen Cart. At the time I purchased it, there was free site to store and it cost $40. It is what I felt was the perfect height for making my rolling ironing station. It's 30" wide x 14" deep and 36" tall... and it has wheels already which solved the rolling part.
Here is how to make your own...
Supplies:
Rolling kitchen cart
48x20" piece of plywood - I rounded the corners
4-8 few pieces of 2x4 or 2x2 wood
a drill 7/8" drill bit if you have one. This isn't necessary - you can get around it ;)
screws long enough to go through your pieces of wood and halfway through the plywood(that length will depend on what size pieces of scrap wood you are using
100% cotton canvas or duck fabric 54x26" approximately
2 pieces of 100% cotton batting both 54x26"
staple gun & staples
Hammer

Step 1 - assemble your rolling kitchen cart
The shelves are height adjustable. I chose to put the top shelf not at the very top so that I could use it once the ironing board is on top. I know it looks deceptive as if I'm using a 4 shelf cart but I'm not. It's a 3 shelf cart with the top shelf just lowered.
Step 2 - Make Your Ironing Board Bottoms
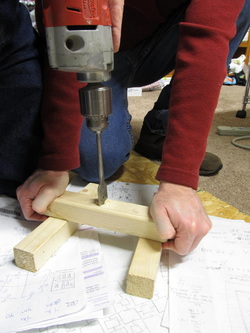
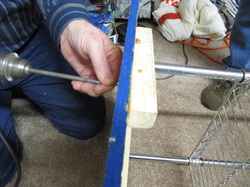
There are two ways to do this. Since we had access to a 7/8" hole drilling bit, we opted to go this route.
Center your drill over the boards that you are going to use to keep your ironing board in place and drill a hole all the way through. You'll need 4 of these, one for each frame pole.
**If your top shelf is even with the top of your shelf system then you will need to use the L method to hold the ironing board in place. A picture of that will be coming up in Step 3 :)
These pieces do not have to be long. You can get away with 4-6" pieces.
Make Sure Your Holes are Big Enough
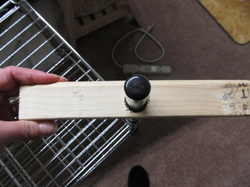
I know it is probably stating the obvious, but make sure your holes are the right size. You want it to fit snugly around your shelf poles
Step 3 - Mark Your Plywood
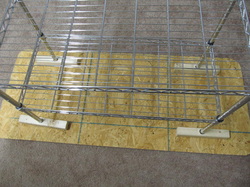
Lay your piece of plywood on the ground. Turn your rolling cart upside down and place it on top, centered.
With a pencil, pen, sharpie, whatever you have on hand, mark where your boards need to be.
With a pencil, pen, sharpie, whatever you have on hand, mark where your boards need to be.
Using the L Method Option...

If you are using L's to keep your ironing board in place, lay them in an L formation to keep the ironing board in place. Mark where they will need to be attached. Repeat for all four corners.
If your rolling shelf has the top shelf on top, just pretend you are seeing a top shelf here. If the shelving system you are using has adjustable shelves, the location of your top shelf is entirely up to you. The shelf system I used allowed me to lower it down so I was able to retain usage of that top shelf and still have the ironing board on top.
If your rolling shelf has the top shelf on top, just pretend you are seeing a top shelf here. If the shelving system you are using has adjustable shelves, the location of your top shelf is entirely up to you. The shelf system I used allowed me to lower it down so I was able to retain usage of that top shelf and still have the ironing board on top.
Step 4 - Add Temporary Screws to Hold in Place
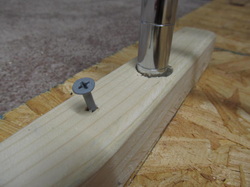
Screw in a temporary, longer screw to each board. It's just easier this way. You can reuse the screws later after you back them out.
If you don't wish to do that then you'll need to hold your pieces in place or have someone else hold them for you while you attach your permanent screws.
If you don't wish to do that then you'll need to hold your pieces in place or have someone else hold them for you while you attach your permanent screws.
Step 5 - Drill in Place
You can take off the kitchen cart now or just turn everything on its side like we did.
Attach the permanent screws.
After they are in place, remove the temporary screws.
Attach the permanent screws.
After they are in place, remove the temporary screws.
Step 6 - Test it Out
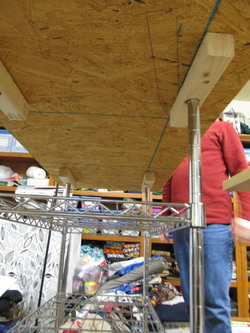
You don't want to skip this step. Make sure your ironing board fits. If it does not, then fix it before you move on to the next step.
Wow. My craft room really needs to be cleaned!
Wow. My craft room really needs to be cleaned!
Step 7 - Attach the Cover
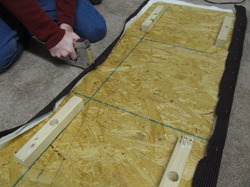
Lay your canvas or duck fabric on the ground, right side down.
Lay your two layers of 100% cotton batting on top of the material.
Lay your board on top of the batting, top or flat side down.
Starting at the center of one of the long sides, staple in place. Work to the edge then do the other side. Leave approximately 3-4" unstapled on the corners. The staples will probably not go all the way in. Have no fears, we'll get to that later.
Pull the fabric on the unstapled side to make sure it has no wrinkles in it. Staple in place.
After the two long sides are done, do the short sides.
Make sure the fabric has no wrinkles and is
Staple the Corners
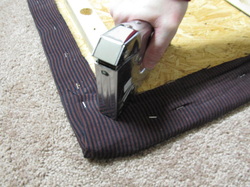
Neatly fold the corners and staple the corners.
Check to make sure you are happy with your top. Flip it over and check for wrinkles, puckers or anything that will annoy you. You want a nice, smooth surface for ironing.
Check to make sure you are happy with your top. Flip it over and check for wrinkles, puckers or anything that will annoy you. You want a nice, smooth surface for ironing.
Step 8 - Hammer Time
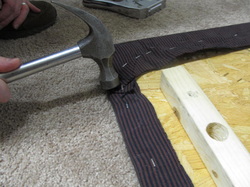
After you are happy with your big ironing board, hammer the staples in.
When you're done, put it on top of your rolling shelves, find something to iron and take care of those wrinkles! You now have an awesome rolling ironing station.
When you're done, put it on top of your rolling shelves, find something to iron and take care of those wrinkles! You now have an awesome rolling ironing station.
