Yarn-or-Fabric
How to Make Your own QR Code Quilt
There are a few tutorials online on how to make a qr code quilt. This is mine. The tutorials I saw online were pretty much cut a bunch of squares and sew them together according to your qr code chart. I strip piece whenever possible. Here's how I did it....
If you strip piece your top, it will go together quickly. I was able to literally make this in one day from cutting to finish(quilting not included). Had I just cut a bunch of squares, I would probably be still sewing... okay, not really but it would have been a really tedious process. These make really great quilt backs since they're fun and can say anything you want from washing instructions to what you would have put on your quilt label.
Please note that I did not measure how much fabric I used to make this quilt. Your fabric usage will also depend on the complexity of your qr code and the code itself. Each code will have a different number of dark and white squares depending on the message.
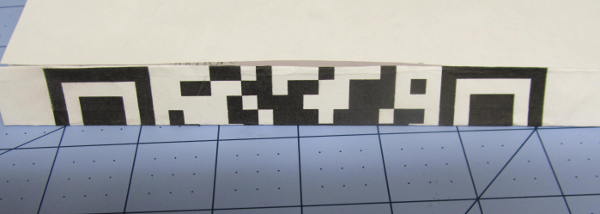
Step 1... design your qr code
I used this online code generator.
Type in the message you would like to generate. Keep in mind, the more words, the more complicated your chart will be. Click generate I set the pixels to 600. Print it out.
Step 2.... determine the size of your quilt
How many squares across is your code? The codes I did for my boys' code quilts were both 33 squares across. I wanted my quilt to be about 66" square for a nice comfy couch quilt.. so my squares will be 2" finished, or 2 1/2" cut squares.
If you strip piece your top, it will go together quickly. I was able to literally make this in one day from cutting to finish(quilting not included). Had I just cut a bunch of squares, I would probably be still sewing... okay, not really but it would have been a really tedious process. These make really great quilt backs since they're fun and can say anything you want from washing instructions to what you would have put on your quilt label.
Please note that I did not measure how much fabric I used to make this quilt. Your fabric usage will also depend on the complexity of your qr code and the code itself. Each code will have a different number of dark and white squares depending on the message.
Step 1... design your qr code
I used this online code generator.
Type in the message you would like to generate. Keep in mind, the more words, the more complicated your chart will be. Click generate I set the pixels to 600. Print it out.
Step 2.... determine the size of your quilt
How many squares across is your code? The codes I did for my boys' code quilts were both 33 squares across. I wanted my quilt to be about 66" square for a nice comfy couch quilt.. so my squares will be 2" finished, or 2 1/2" cut squares.
Step 3. Prepare your code chart
Fold your chart so that the first 4 rows are visible. You will work with the chart 4 rows at a time. When you finish sewing the first row, you will simply refold the chart to show the next 4 rows.
You can do the next step one of two ways... just cut out a set of strips for each combination and wing it, not knowing how many sets of each strip set you will need or you can figure it out. If you just wing it, you'll end up with waste. To count your strip sets, fold your print out of your code to show where each 4 row section is on your printed out code. On a separate piece of paper, keep track of each strip set that is required. For example your first 4 row strip set will be dark, dark, dark, dark - write "dddd" on a piece of paper and write a line next to that. The next one is black, white, white, white so on your paper write "dwww" and put a mark next to that... continue through the entire chart, keeping track of each strip set you will need.
You will need the following strip sets:
dark, dark, dark, dark
white, white, white, white
dark, white, white, dark
white, dark, dark, dark
white, dark, dark, white
dark, white, white, white
white, dark, white, white
dark, white, dark, dark
dark, dark, white, white
dark, white, dark, white
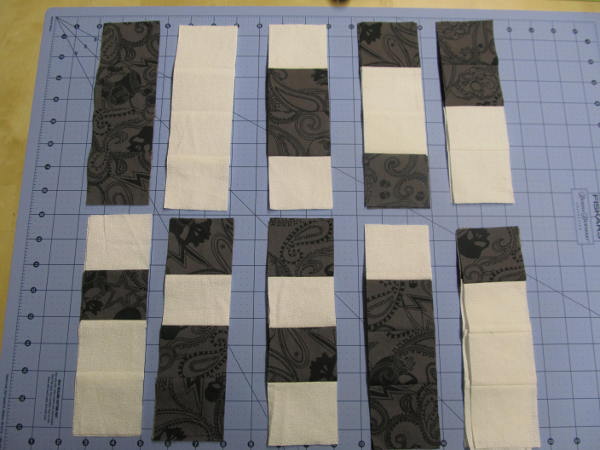
Step 4. Cut and sew your fabric
Use a dark and a white/light for your fabrics. Cut them in to strips to the size needed.. If your strips are 2 1/2" wide and your fabric is 42" wide then you will be able to get 16 strips for each width of fabric.
Sew them in to strip sets.
A note about ironing. Iron the strips any way you like. If they are ironed to one side, the folded seams will not always butt up against each other unless you plan ahead and figure out how many of each strip set will need to be ironed one way or the other.
Subcut the strip sets. If your original strips were 2 1/2", then cut in to 2 1/2" strips to keep them square in the end.
Step 5. Start Sewing
Sew your strips together. In the picture of the printed qr code chart shown earlier, the first strip set is dark, dark, dark, dark sewn to a dark, white, white, white.
I'm fairly retentive about matching up my points. There are a lot of them to match up in this quilt since you're dealing with squares. Your quilt will look nicer if you go the extra bit and try to match up those seams as best as you can.
I'm fairly retentive about matching up my points. There are a lot of them to match up in this quilt since you're dealing with squares. Your quilt will look nicer if you go the extra bit and try to match up those seams as best as you can.
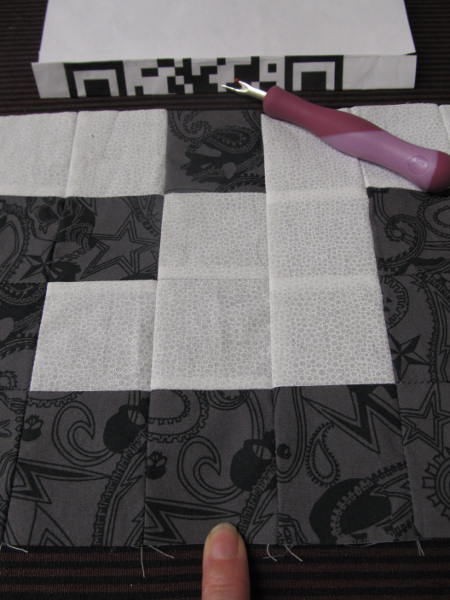
Double check while sewing... I made mistakes... here is one now... fix it before you move on. You can see from the seam ripper that the row should have been a dark, white, white, white. Why I sewed a dark, white, white, dark is beyond me but I did.
If it helps you, draw a line through each strip set row as you progress so you don't lose your place. I started off doing that but once I got my rhythm going, I didn't need to keep drawing through the rows I did.
After you finish the first row, move on to the next.
Since my code quilt was 33 x 33 squares I had to do some fancy sewing for the last lonely row. I simply used my strip sets horizontally instead of vertically for this row then sewed it on to the bottom of the last full 4 square high row made. Alternately, you can sew 4 rows across then sew a strip set across the bottom to make it 4 wide by 5 long. Do whatever is best for you.
Step 6. Sew your finished rows in to twosies
Once you have finished all of your rows, double check your work again. I know it sounds crazy since you were checking all along. Trust me. Double check it now. I found 4 mistakes that I missed before. You don't want a typo in your code quilt! How miserable would that be? I wish I took a picture of the strips on the design wall and checked them against my phone's code app. I wonder what it would have said with the mistakes....
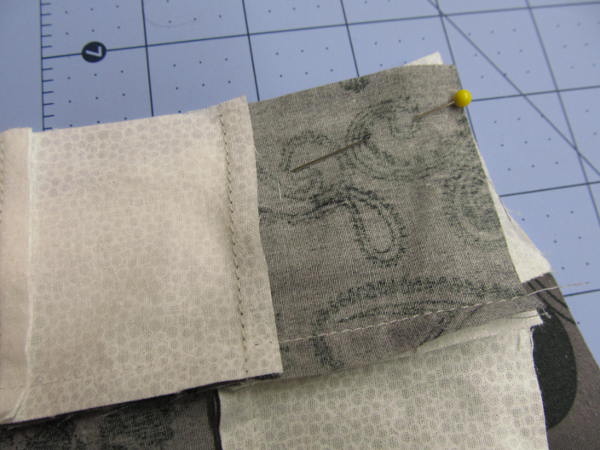
Once you are satisfied that your strips are 100% perfect, sew them in to twosies. Lay one strip on top of another and sew them together... Make sure that you are sewing them in the right direction. Ask me how I know to remind others about that....
Once you are satisfied that your strips are 100% perfect, sew them in to twosies. Lay one strip on top of another and sew them together... Make sure that you are sewing them in the right direction. Ask me how I know to remind others about that....

A tip!
I had made a mistake or two when sewing the strip sets together. It seemed that my brain would do a drop once I took the strips to the sewing machine and not remember which side needed to be sewn. Just put a safety pin in the corner that you are going to start sewing in.... no more brain freezes!
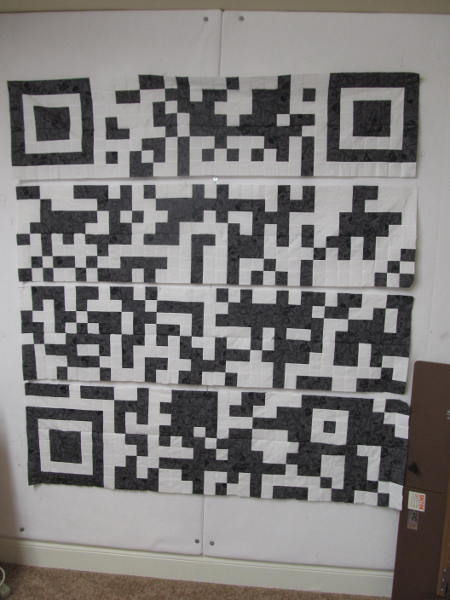
Step 7. Sew in to foursies
Once your rows are sewn in to twosies.. Below is a picture of the strips on the design wall after the twosies were sewn together. Just keep assembling it....
Step 8 - admire your work - you're done!
Okay.. technically you aren't done. You still have a bit left to do. Once your quilt top is assembled you can either go ahead and quilt it or you can add borders around it. It's entirely up to you. I chose to keep it as is and used it as is. It fit with the opposite side of my quilt. You know I love making double sided quilts! Why make one piece of art when you can do two at a time and add a bit more versatility to it.

